
,%20this%20blog%20post%20will%20give%20you%20thre...)
Sweet Christmas - Extra Scrappy Happy Snowman Projects to Make

If you purchased the Sweet Christmas Snowman panel and are wondering what else you can do with the extra printed pieces on the panel (besides the obvious quilt), this blog post will give you three suggestions showing what we made: Bunting, Hot Pads & Pillow Cover. We hope these get your own ideas flowing with creativity! Be sure to post and share your creations in the comment section below.
********************************************************************

1. Christmas Decorative Bunting
After sewing together a quilt using the Snowman Panel from the Sweet Christmas collection by Urban Chiks (for Moda Fabrics), my mind was racing with all sorts of other ideas to make with the remaining panel pieces. Jamie, one of our employees, was looking at the panel with me and was intrigued by the Christmas greeting printed on the side. She brilliantly suggested making a bunting using the words plus various scrappy prints from a coordinating charm pack. We brainstormed the best way to cut the Christmas greeting words and determined that cutting them out individually would maximize their visibility. She decided to make hers with scalloped pieces in between and I opted for the traditional triangular bunting pieces so I could utilize our new 45 degree diamond / triangle ruler. I've included many photos and tips for this tutorial, so grab your extra Snowman Panel scraps and follow along!

1. Cut the words carefully, leaving about 3/8" - 1/2" of white fabric space all the way around. This will allow enough room to sew 1/4" seam allowance.

In between the words I was able to cut, leaving about 3/8" to 1/2" of white space, on both sides of the letters.

I set my ruler with the 1/2" marks on the edge of the words and cut using a rotary cutter.

2. Place all word fabric pieces, right sides together, onto scrap pieces of fabric. (We used white so that a print wouldn't show through.) Then, using each word piece as a cutting guide, cut a scrap fabric piece to match each word piece size.
3. Starting at the top of one short side of the word pieces, sew 1/4" seam allowance - working down one short side, across the bottom and up the other short side. Leave the top open for turning right side out (shown in the next two photos).

4. Turn all word sections right side out. (I like to clip my corners and fold over the seam allowances at the inside corner ends before turning. This helps give a sharper point.)

A point turner works well, too.

The top edge of each word piece will remain open.

You will need a charm pack or twenty-one 5-inch squares for the remaining steps.

5. Back twenty-one 5-inch squares (from the Sweet Christmas Charm Pack) with 5-inch white fabric squares (or coordinate with the remaining twenty-one charm pack squares) and cut using the 45 Degree Triangle side of the Featherweight Shop Diamond Ruler.

6. Leaving top of each bunting unit open, begin sewing down one one side of the triangle, pivoting slightly at the point, and then sewing up the opposite side.

7. I stitch across one stitch horizontally at the point (a tip I learned when sewing apparel), but you can pivot on the exact point if you wish.


8. Chainstitch all triangle units to make the sewing go faster.


9. Clip the corners for a sharper point when turning right side out.


10. Turn all triangle units right side out. A point turner, again, works great for this step!


11. Turn all your bunting pieces right side out and set aside along with your word units.
12. Now it's time to make the peppermint bias. You will need 1/2 a yard of Peppermint Pink and Red Stripe fabric to have enough for bias cutting. Cut 8-10 bias strips. This will yield you about 18-20 feet of bias trim when all strips are sewn together.


13. I used the Bias-Cutting Ruler for this project and it was fabulous!! The ruler made cutting and sewing a breeze, because I could align the ruler edge to the fabric, cut and then match the seams exactly without having to do mental gymnastics to make sure I was doing it correctly. Brilliant and breezy!


14. Sew all your strips together until you have yards and yards of gorgeous peppermint trim!

15. Using 1/4" seam allowance is adequate. Press all seams open when finished. I use the Featherweight Accurate Seam Guide to achieve an exact quarter inch seam when I am stitching my bias pieces together.

I am sure it was nothing but providential happenstance, but even my stripes sewed together exactly! This was not planned, but it did make my heart leap with giddy excitement at each seam.
16. To press bias trim, it's a bit different than pressing binding for a quilt. First, fold the bias lengthwise in half and press. This fold and pressing line will become a guide for the following steps.

17. Next, open the lengthwise pressed bias and begin folding and pressing one long side toward your center crease. Follow with folding and pressing the second long side toward the center crease as shown in the photo below.

18. Finally, fold in half again along your first crease, but make sure that one side of the bias tape is ever-so-slightly offset and indented from the other. This indented side will be the top-stitching side.

19. One side will be about 1/16th of an inch wider than the other. The narrower side is your top-stitching side.
20. Lay out all bunting and word pieces for alignment, deciding how far apart they should be. Don't forget to calculate how much extra tape should be at the beginning and end of the bunting. MARK WHERE THE FINAL BUNTING PIECE SHOULD BE WITH A PIN, because this will actually be the first bunting piece sewn. Essentially, this gets sewn in reverse. (I used a pin to mark the spot of the last bunting piece -- see third picture below.)

21. Stack all your bunting pieces in reverse order. The last bunting piece will end up being the first one sewn, so it should be the top piece in your stack.

22. Begin topstitching the bias tape closed. The slightly indented top side assures that the bottom side will be caught and sewn. Don't forget to look for the pin-marker to begin adding the bunting pieces.


23. One-by-one, add the bunting pieces, carefully spacing them as desired. Remember, these should be in reverse order if you stacked them properly.

24. Tuck the top of each bunting piece into the bias trim so that it is securely stitched in place.


The word units were not tucked as deeply, but still enough for the words to show and to be stitched securely in place.

25. Top-stitch all the way to the end and decorate your halls for Christmas with a new vintage-styled bunting!

Jamie used a circle template and made her bunting as half-circles... both styles are cute!
********************************************************************
2. Cute Hot Pads & Snowman Pillow
Remember using the 45 Degree Triangle side of the Featherweight Shop Diamond Ruler to cut the charm pack for the bunting? Well, we want to try and use up as many scraps as we can. so let's go back to the little pieces that got trimmed off and see what can be made with those!
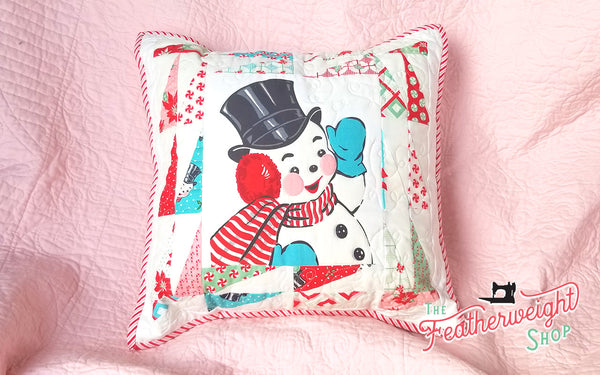
On the panel, there is a smaller sized snowman facing the opposite direction (when compared the larger snowman for the quilt). Using the trimmed skinny triangle pieces, I decided to frame the smaller snowman piece and make a quilted pillow cover as well as make a few hot pads for Christmas gifts. The triangles reminded me of icicles, it utilized some great scraps, and the snowman matches the quilt for a cute coordinate! I'm already looking forward to adding these to our Christmas decor in a couple of months.

The skinny triangle pieces that were set aside from the bunting project can now be put to good use.

1. Flip the pieces so they align this way.


2. Sew pieces right sides together and then press open with seams pressed to the printed side.


3. Arrange and sew the half-rectangle triangles however you wish, flipping and turning the points for different effects. I sewed a few together so that I could make some hot pads later.

4.) With the sewn scraps that are left, continue making the Snowman Quilted Pillow Cover, arranging the scraps however you would like. I was not being very particular with this project, because I wanted to construct, sew, trim, and quilt it freely without the worry of having a perfect design. I also did not want to spend a lot of time on it, so the pillow cover could be finished quickly and easily. (This was me being thrifty and having carefree fun!)
I already had an 18" pillow form, so in order to attain the proper height and width, I needed to add some coping pieces on all sides (before quilting). Coping pieces are the narrow white strips added all the way around. I made sure the pieced pillow top was large enough (19" to 20" or so) to accommodate trimming to size after quilting.

5. Once the pillow top is finished, layer the top, batting, and inside pillow lining to prepare for quilting. (I just used some more white fabric for the pillow cover lining. It wouldn't be seen inside with the pillow form, so it did not have to be anything cute.)

I wanted to machine quilt this on my Singer Featherweight 222, so I pinned it for free-motion quilting. However, the pillow top can be quilted in any number of ways (see below for ideas).

I have a 222K Featherweight (the kind with the free-arm), so I dropped the feed dogs and used the vintage original darning & embroidery foot (that came with my machine originally) to do all the free-motion quilting. GOOD NEWS! Free-motion is still entirely possible on a Singer 221 model as well! Follow this video tutorial and utilize the 221 embroidery foot and feed cover plate to quilt many small projects. Channel quilting is another option, too, using a Walking Foot. Click here for a tutorial.


With free-motion quilting, I was able to trace around the Snowman's eyebrows, eyes, nose, mouth, cheeks, earmuff, scarf, mitts, hat, body and buttons. He was pretty small, so I just accented his adorable features.

Here's a look at the back to give you an idea for what it looks like. It's not perfect, but it was a very enjoyable accomplishment to do this all on my Singer Featherweight.

I made a few loopdy-loops to look like snow flurries and voila! The pillow cover was all quilted!
6. Next, trim the quilted pillow top to be about 18 1/2".

7. Select two pieces of fabric for the back of the pillow and hem one side of each fabric piece. These two hemmed sides will overlap one another so that the pillow can be tucked and inserted into the pillow cover. They will be seen on the back side.

8. Pin back fabric pieces (both pieces right side up) to the back
of the quilted pillow top cover, aligning edges all the way around. Baste in place using about a 1/4" seam allowance. A walking foot makes basting so much easier!

(Basting all the way around.) You can see both the front and back of the pillow cover in the photo above!

9. Finally, add binding all the way around, just like you would a quilt, and join the ends using your preferred method. (Click here for an example of how I do this final step). Again, a walking foot makes this step easier, because sewing all the layers can get too bulky for a standard presser foot.


10. Add pillow form, turn on the Christmas music, and get out the rest of the Christmas decorations, because Christmas is coming soon!

