

How To Properly Set the Needle (Getting To Know Your Featherweight, Part 3)
Part 3 of Getting To Know Your Singer Featherweight 221 - the right way to remove, orient, and seat the needle so every stitch lands clean.
How To Properly Set The Needle
Part 3 of the Getting To Know Your Singer Featherweight 221 series will show you how to properly set your Singer Featherweight needle. This tutorial by Ruthie will be especially helpful if you notice your machine having skipped stitches or even if your bobbin thread won't pick up easily. Be sure to watch the video all the way to the end because she includes a couple of troubleshooting tips for you, too!
Suggested Products:
1) Schmetz Needles
2) Fabric
3) Crosswound Spool of thread: Aurifil or Presencia
4) Featherweight Accurate Seam Guide
5) Singer Featherweight Instruction Manual 221 or 222
Removing the Old Needle
To begin to set the needle properly on a Singer Featherweight 221, you will need to turn the handwheel towards you to raise the needle bar to its highest position. Loosen the needle clamp thumb screw just a little bit and then carefully remove the old needle.
HINT: We recommend SCHMETZ needles because new "Singer" brand needles are not the same quality that they used to be. The eyes just aren't finished off as smoothly causing the thread to often fray or split.
A Schmetz needle size 80/12 in Universal or Microtex is perfect for standard sewing or piecing. A 70/10 is also an excellent choice if you are using a finely woven fabric like Batik, Batiste or Liberty Lawn.
Which Way the Flat Side Faces
It is very important on a Singer Featherweight that the flat side of the needle faces left - always.
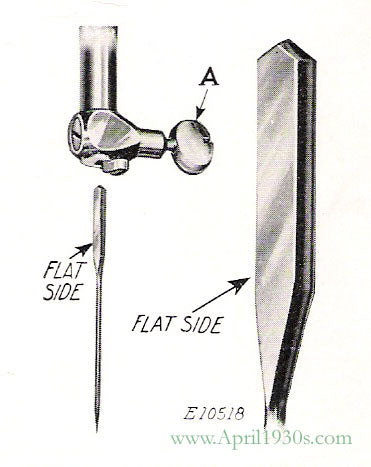
An easy way to remember this is to take note of the upper portion of the needle shape. Notice the curvature on the right and the flat side on the left? It's shaped like a capital D, which matches the curvature and flat side on your throat plate of your Singer Featherweight 221 model.

Seating & Double-Checking
Therefore, insert your needle into the shaft with the flat side facing left, making sure the needle is all the up into the shaft. Tighten your needle clamp thumb screw securely.
Before you begin sewing, make sure to slowly again, by hand, turn the handwheel of your machine towards you. This will be your last chance to double check to make sure the needle is all the way up in the shaft. If you hear or feel a "clunk", then the needle is hitting the hook assembly and is, therefore, not inserted far enough into the needle bar shaft.
Thread your machine (click here to learn how to do that) and begin stitching.

Troubleshooting
When Stitches Skip
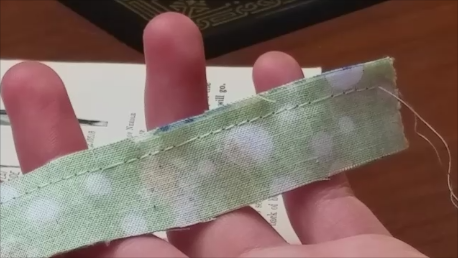
If your machine is now skipping stitches or won't stitch at all, after changing the needle, then it's possible that the flat side isn't facing exactly left, and may be facing towards the back of the machine or even facing right.
Here's an example of what the stitches might look like if your needle is inserted with the flat side facing the back (which is the common position for needles in most new, modern sewing machines):
If the video was helpful to you or if you think it would be for others, be sure to leave a comment below and like or share this on Facebook. (Ruthie would really like that, too. ;))