Shop Talk: Featherweight Sewing Machine Mat & Cover

For a few years now, I have been wanting to make the sewing machine mat and cover that is featured in Lori Holt's book Quilty Fun. So when she recently released her new Prim fabric line, I thought it was the perfect time to make this for our little sewing studio (as well as for me to use when I go on any sewing retreats!)
It was an enjoyable project, and the fabrics came together so beautifully, that we decided to offer this as a kit, available to order here. The kit does include the Quilty Fun pattern book which, besides the Sewing Machine Mat & Cover, is chock full of other fun projects and quilt inspiration! Lori's instructions have all the elements of a tutor at your side and each little step will put you at ease as you begin something new.


*********************************************
To make the Sewing Machine Cover & Mat, the first thing I did was select a good sampling of assorted prints according to the pattern instructions. If purchasing a complete kit, then be assured, enough variety has been included for you to make a beautiful scrappy design...just like the one you see in the photos on this blog post.

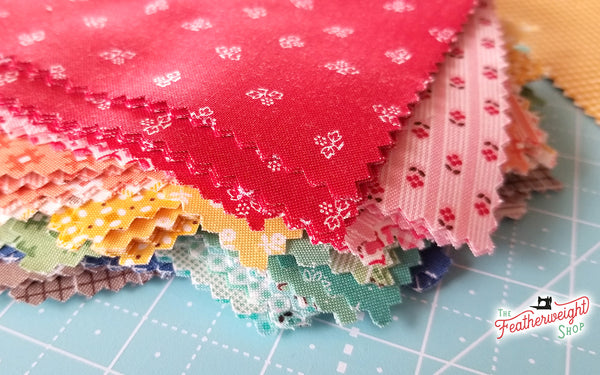
Since the spools were front and center, I selected the prints for those first, followed by the prints I wanted to use for all the hourglass units.

I'm one of those that never trusts the precut measurements with the pinked edges, so I take the time to trim them off when cutting for a pattern. This isn't always feasible if wanting to get the most cuts out of one square, but for this pattern, I could be as particular as I wanted to be.

Using Sue Daley's round, rotating cutting mat is a wonderful companion to most any Lori Holt pattern. The compact size allows me to trim and rotate the fabric piece easily. As you will recall throughout our Sew Along that finished up earlier this year, I am always reaching for the Itty Bitty Eights rulers for trimming and squaring up. Having the dashed lines allows for easier visibility of the fabric to trim as accurately as possible.

See how the small dashed lines dissects the edges of the fabric? Now I know my piece is aligned perfectly to trim the excess pinked edge.

For Lori Holt's technique, you will simply have to purchase her pattern book or kit. The technique I use for sewing hourglasses involves my most-used ruler: the Folded Corner Clipper. To make an hour glass block, no matter how large or small, you have to sew four triangles together. There are a number of techniques, but I find that precutting and sewing the triangles together first is the fastest and most accurate for my sewing abilities.


Once the first set of triangles are all cut, I pair them together and chain-piece them till they are all sewn. I prefer to use the Seam Square and Featherweight Accurate Seam Guide for the accurate quarter-inch seam allowance.

I press my seams to the dark side.

Continuing with the hourglass construction, pair them up with each other and repeat the cutting and chain-piecing process. Having pressed the units to the dark side, I was careful to pair them up so the seams were opposite one another.


Ready for chain-piecing, round two!

Sometimes pressing open can help minimize seam bulk later on in the sewing and assembly process.


Trim as directed in the pattern instructions and you have your hourglass units! Aren't they so pretty?!
Now the fun begins with laying them out and sorting for visual appeal. This step reminds me of a reverse jigsaw puzzle: making sure the prints and fabric designs go together properly, but without too much focus of color in one area. The prints need to blend and blend nicely!

To put the sewing machine cover & mat together, I am going to attempt to show you in photographic form how to chain piece the entire mat as one solid unit. To understand the concept, step back for a moment and visualize this layout as one giant block rather than a quilt top. How would you put it together, if it were one block so that you could maximize the chain-piecing process? If you guessed "sewing it in columns," you would be correct! So let's begin.

First, sew column B to column A by flipping over all the column B pieces and laying them on top of column A pieces. Chain piece this first column, beginning with the top two piece units and sequentially sewing the next unit pair and the next and the next until your first column is chain pieced.

DO NOT CUT THE CHAINS BETWEEN YOUR UNITS (only cut the chain after sewing the bottom unit)! You can see in the pressing photo above how the chains are holding the sewn and pressed units together. The chains must remain connected this way throughout the entire sewing time. Trust me, it works! ;)

Now, begin stacking your next column, like this, keeping the top piece on top as you stack. They must remain in top down order, right side up! The Sew Handy Stickers work great for this. Follow with the remaining columns so you can quickly sew each column, one right after the other.

Continue sewing your columns together this way but again, DO NOT CUT THE CHAINS IN BETWEEN THE UNITS! The chains will act as a link to form the rows when you are all finished and it is an exciting challenge to accomplish.


I press as I sew a column, pressing each unit seam, above and below, in the opposite direction. This will make for easier row sewing as the seams will nest together. Can you see the little chains? They are NOT cut!

Now the rows are ready to sew together! Because of the chains holding the rows together, I won't have to worry about getting pieces or rows mixed up and the seams are already nesting from how they were pressed.

Begin with the top two rows, leaving the chains intact, lay right sides together and sew the first row seam. Continue with each subsequent row seam until your sewing machine mat & cover top is completely sewn.

DO NOT CUT THE CONNECTING CHAINS! They will eventually just disappear into the mat and you won't have to worry about them at all.

To reduce bulk, I pressed the row seams open.

Voila! Isn't it pretty?!

Sew the spool section as instructed. If using the kit, you will notice that Nutmeg Shabby fabric print is used for the top and bottom spools to represent the old-fashioned wooden spools of yesteryear.
 Layer the top, batting and backing as instructed. It is not required to quilt such a small project, but I wanted a little stability, so using the Singer Featherweight designed Walking Foot, I stitched every other column and row, using the hourglass points as my guide for the quilting lines.


Notice the stitch length for quilting. With so many layers, a longer stitch length is needed to prevent any puckering. My machine is set at about 6-7 stitches per inch.

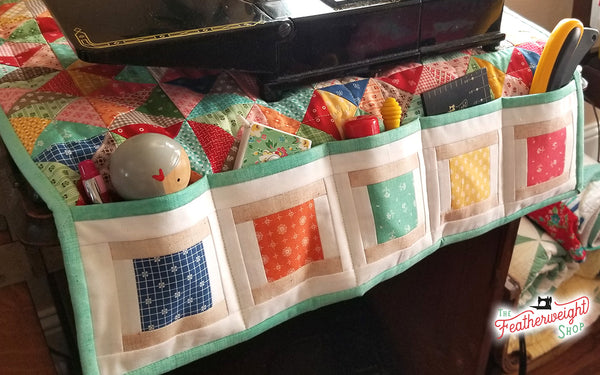
 To form the pockets, quilt all layers and sew as directed.
TIP: Start sewing at the top of the pocket, working your way to the bottom edge. Any puckering will be absorbed in the binding and won't be seen.
 Add ties as instructed (and if desired) and bind the Sewing Machine Cover & Mat using your favorite quilt binding methods and techniques.
Before taking the mat & cover down to the shop sewing studio for use, I had to quickly test it out by setting my black Singer Featherweight 222 on top of the sewing cabinet.

I love the Sea Glass Shabby Fabric for the ties. They are so cute!!


Pockets are perfect for so many sewing notions! Wonderclips, rotary cutter, thread snips, thread, scissors, bobbin roll, small cutting ruler, and even the necessary retractable seam ripper!


ORDER SEWING MACHINE MAT & COVER KIT HERE
