
Stitch Along: Singer Featherweight in Cross Stitch - Part 1
Everyone knows it's fun to sew something quilty with a Singer Featherweight, but it is also enjoyable to use your needle in a different way and stitch a Singer Featherweight itself!
I'm Kristen from Verity Vintage Studio, and in the coming weeks I'm excited to walk with you through stitching this lovely cross stitch kit designed by Margaret Lee and available from The Featherweight Shop.

Counted cross stitch can look quite complicated at first glance, but it's actually quite easy and manageable when broken down. Even elaborate designs usually use just little crosses (made of straight stitches) and regular straight stitches, so if you can make a needle go up and down, you can do counted cross stitch!
Supplies
- Featherweight Cross-Stitch Kit (with 14 count Aida Cloth) - If it is sold out, you can sign up for the in stock notification at product link, and you will be notified as soon as we have more kits available. Also available in 32 count.
- 4-inch or 6-inch Embroidery Hoop
- Embroidery Scissors
- Hand-sewing needles in various sizes
- Already have the supplies on hand? Printed Pattern only is available here.
- Advanced in cross-stitch skills? The Belfast Linen 32-count Kit is available here.
- Floss drops
- Need more floss colors for your Cross-Stitch repertoire? This Bee Basics 20 Spool Set is super handy to have for many cross-stitch and embroidery occasions.
First, let's take a look at the kit and what it includes, then I will show you how to get started.
Your kit includes instructions, cloth, and embroidery floss—already sorted out in such a handy way on the color chart that gives you the color number, and the symbol for where to use this particular color on your pattern chart.
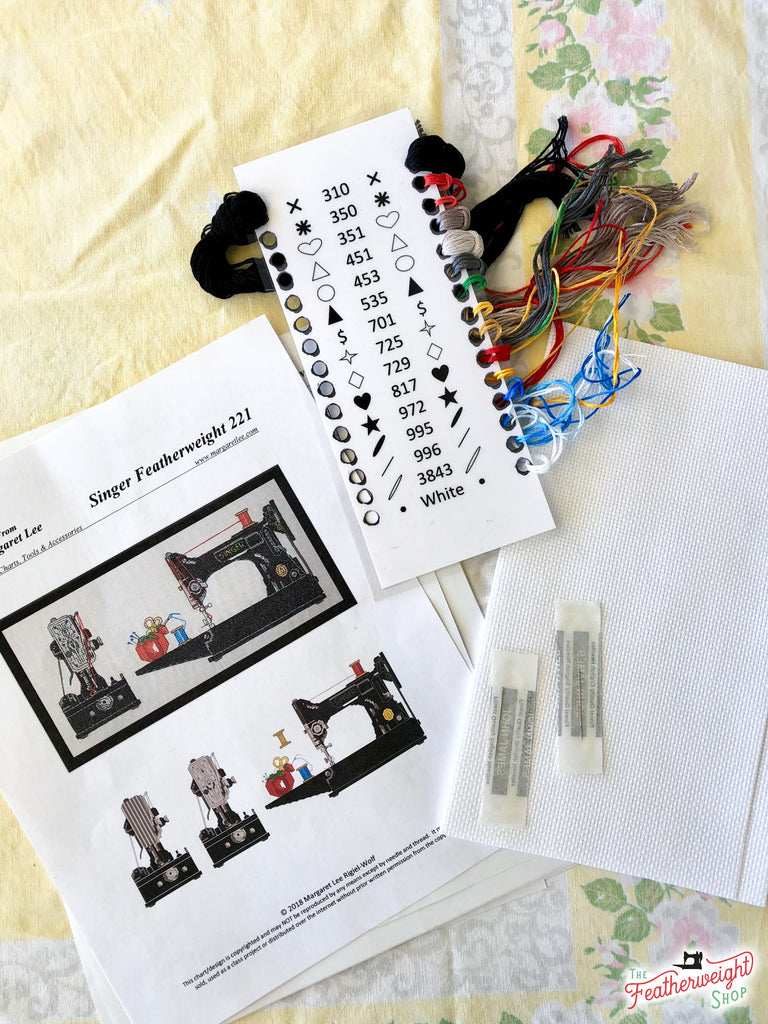
Not included are needles (linked above in the supplies required) and scissors—choose short, sharp scissors like these Heirloom Embroidery Scissors from Sullivan's—and an embroidery hoop (optional if you prefer working without one).

You can certainly use your own embroidery needles if you have them, but other types of needles like these lovely Tulip assorted embroidery needles are nice to have—needles that are short, sharp, and have large enough eyes for easy threading of multiple strands of floss. One of my pet peeves when stitching is when I only have a few needles, and have to switch out the colors for just a few stitches, knowing I will have to rethread the needle with a new color right away. So to have lots of needles available means that I can have one for each color without having to switch them out of the same needle – definitely a win! The assorted sizes and thicknesses allows you to choose your favorite to work with.


Preparation
When you have a piece of folded fabric to work with, like the one that comes with this kit, it's a good idea to dampen and dry it before you start stitching. Strong creases pressed into it will distort your stitches and make it harder to work with—but don't put it through the washing machine! If misting with water doesn't eliminate the sharp creases, a light press with the iron should do the trick.

You will also need to decide which end view you will be including next to the front view. The picture on the front shows the two options, but only the scrolled end view is photographed actually stitched and framed beside the side view. For this Stitch Along, we will be doing the scrolled end view for our sample here.

The first page of instructions shows you again your color key and the symbol used for each color, in case you need a more detailed reference than the floss chart provides. It also gives you the finished size for two different types of fabric. We are working with 14 count Aida cloth here. Aida cloth is specially made for cross stitch, with a tiny grid and holes that make it easy to see where each cross should be.
The stitching chart has been broken up into several pieces. I recommend you tape the front view together so that you see the entire design. The gray area on page 3 is an overlap of page 2, so trim the white margin off of page two and tape it to page three, overlapping the gray area.

If you notice that the design does not match, don't panic. The chart is correct, just the scale is slightly different from one to the next which keeps it from perfectly matching. You may want to tape one part of the machine to match, and then when you are finished stitching it, move the chart to match the other part of the machine to avoid confusion.

Page 4 shows the scrolled end view, which we will be using. You can lay aside the other end view as we will not be using it for this project.
The remaining pages show outlining stitches and detail stitches that will be worked when all the cross stitching is finished. These details are shown in larger format on the big charts, but the smaller charts tell you which color to use and how many strands of embroidery floss.
Getting Started
Now that our fabric is prepared, you need to find the center of it. Fold it in half, then in half again, marking the center point with a pin or needle. When you unfold the fabric, that shows you the center of your fabric, which we must compare with the center of the design.


The little arrows on the cross stitch charts show the center, so you can follow them to where they meet to find the exact center of the chart. However, since this one is a combination of two charts, the center we start with will not be marked on one particular chart, but has to be a combination of both charts. So we must do a little easy math.
The stitch count on page 1 of the instructions is helpful for this, so you don't have to count across the entire chart yourself. It says that the front view is 103 stitches wide, and the face plate is 36 stitches wide. These added together make 139 stitches wide, but we also have to add some space between them, so we will add 12 stitches for this, making our total width 151 stitches.

151 divided in half is approximately 75 stitches, so to find the center, we count in 75 stitches from the right edge of the side view, starting on the first row with a symbol, which puts us right here. Mark the place with a pen or pencil. This spot will correspond with the spot marked with a pin on your fabric.
However, as you can see, there is no actual cross stitch there, just an outline stitch which we do after the cross stitches are done. So we use it as a reference point and count over to find our first stitch. The spool of thread is the closest, but I prefer to work the major piece of the design first, which is the machine. For this chart, I'm going to count over to the right to start above the machine needle, and mark this spot as my beginning stitch.

The first symbol for the machine is on the 13th stitch to the right of my center mark, so on my fabric I count over to the 13th stitch to the right of the pin. This is where I will take my first stitch. You can use another pin, or move the center pin over.

Now that I have the spot marked, I go ahead and center it in my embroidery hoop, (because I like to stitch with a hoop). If you prefer not to, that's fine! Whatever feels most comfortable for you works.
The instructions say to use 2 strands of floss for the cross stitch, so next you match the symbol of the first stitch to the floss chart. In this case it is Shell Gray. Remove one piece of floss from the floss chart. The thicker strand of floss is comprised of 6 thinner strands. Slightly untwist one end until you can see the individual strands, and separate two together. Make sure to pull gently so you don't tangle the floss.

Now thread your needle, and we are ready to start!
Cross Stitching
A couple of basic rules for cross stitching are:
- Never tie a knot in your floss.
- Always make your crosses the same way!
It doesn't matter if you prefer to have the top cross to right to left, or left to right – but they all must go in the same direction once you start.

To take your first stitch, bring up the needle, leaving a thread tail of approximate 1/2-1 inch underneath. Hold it with your finger. Take the needle back down, but before you bring it up again, turn the fabric over and make sure that your second stitch will pass over the tail, thus securing it. You can trim the tail a little shorter once it is secured, if you wish.

Now you can continue, making a little cross in this color where ever you see the symbol, making sure the needle comes up and goes down cleanly in the little holes. You will also see on the chart a half stitch symbol, where a block is split between two colors. Half stitches are especially used to make more precise curves, so you will find lots of them around the tension knob, for instance. To work a half stitch, when you do the second half of your stitch, pierce the center of the block instead of completing the cross (this is why I like sharp needles for cross stitching!)

It is a good idea not to skip from spot to spot very far without cutting your thread – you want a tidy back side, so the threads passing underneath don't show through to the front. But it's ok to skip over a few stitches.

When you have worked all of this particular color within reach, or need to rethread your needle, time to fasten off. To do this, simply turn over the fabric and run your needle through some of the back sides of the stitches, then trim the thread. No knots, remember – and don't worry about it coming loose. For a design like this with tight stitches, which will be in a frame anyway, it really isn't a problem.

You will notice that your fabric starts out quite stiff and unwieldy, but will crumple and soften as you use it. Don't worry about that. When you are finished for the day, I recommend removing the embroidery hoop if you are using one, smooth and fold the fabric flat to store.
Well, now that you are started, you may find out it can be addicting! Just to finish one more row, or one more color, or one more corner...it can go surprisingly fast. Plus it is so enjoyable to see the design take shape on a completely blank background, coming to life under your needle as the floss fills it in with color and form.
I'll be back in a few weeks with a project progress update, and some tips for quicker and more perfect cross stitching, plus how to fix a mistake. Meanwhile, happy stitching!
GO TO PART 2 >>
