
Is Your Machine Jammed?

April 7, 2020: UPDATE & ADDENDUM, New Video Tutorial
In September of 2014, we posted a Video 1 Tutorial showing how to remove thread from the hook assembly on a Singer 221. Then, in May, 2018, we updated the video to add the tutorial for the Singer 222 (first video below). Finally, in April of 2020, we have a newly Featherweight Shop designed apparatus that will make this process even easier - the Thread Jam Tool! Designed to be used with universal application on Singer 221, 222 and Singer 301 hook assemblies.


Watch the first video for getting thread loose with tools you may already have, but be sure to watch the Video 2 update for an easier and quicker way, which includes the use and instruction of the Thread Jam Tool. Learn how to easily and quickly get the hook assembly loose and running smoothly again.
******
ORIGINAL VIDEO 1:
If a Singer Featherweight 221 sewing machine is jammed and the handwheel won’t turn, chances are there is thread caught behind the bobbin case base and possibly the hook assembly. This video tutorial will instruct how to remove the culprit thread and remedy the problem without the thread jam tool.
UPDATE - VIDEO 2, featuring the Thread Jam Tool:
After working with many, many customers over the years and assisting them with thread that gets caught behind the bobbin case base and hook assembly, we have invented and designed an apparatus that will make this thread-removal process even easier! Introducing, the Thread Jam Tool. Again, this is designed to be used with universal application on Singer 221, 222 and Singer 301 hook assemblies.
First, let's discuss the details of a thread jam and then we will talk about how the Thread Jam Tool is helpful and sometimes necessary.
A common question we receive is:
“what happened to my machine?…..I was just sewing along and it locked up…..I can’t turn the handwheel at all.... but if I take the throat plate off, the hook assembly moves and I can turn it, but when I put the throat plate back on, it gets jammed again."
This description is nearly always a tell-tale sign of a thread jam.
So, what exactly is a thread jam? A thread jam is when a little piece of thread, sometimes not even visible from the outside, gets caught between the hook assembly and the bobbin case base.
What causes a thread jam?
- Turning the handwheel the wrong direction.
- Not holding onto the thread tails at the start of a seam.
So, always turn the handwheel towards you, no matter if you are needing to stitch forward or in reverse, the handwheel should always be rotated in this motion and direction:

And, hold your thread tails at the beginning of every new seam, like this:
If you do those two things, you will eliminate most all thread jams.
How can I fix a thread jam? When a Featherweight is locked up (presumably, from a piece of thread) and to determine if you have a thread jam, first remove the needle / throat plate. Once the needle plate is removed, the hook assembly will usually spin freely because the positioning finger is no longer in the slot under the throat plate. At this point, the thread jam has not been removed yet, because if the needle plate is placed back in position, the machine will reveal itself to be locked or jammed once again.
In our previous Video 1 above, when a thread jam like this would occur, the only option was to remove the bobbin case base to locate the piece of thread, or if the thread was behind the hook assembly, remove the assembly altogether.
There are a couple of things that occasionally make this task difficult, however.
- Gib Hook Screw (two styles) - can be difficult to remove, especially without the proper Small Wera Screwdriver.
- Bobbin Case Base - can only be removed when aligned perfectly. And, if the bobbin case base cannot be rotated for proper alignment on the hook assembly, the thread jam remains.... or at least until lots of sewing machine oil, perseverance and long-suffering patience can keep working at it without damaging the parts or machine. (For example, if the handwheel is forced or if a wrong tool is used to pry it, the bobbin case base positioning finger can snap off and replacements are costly!)
GOOD NEWS!
Burl, our tech manager here at The Featherweight Shop developed the Thread Jam Tool!
Thread Jam Tool Benefits:
- Safely and more easily turn the bobbin case base to remove any locking thread(s).
- The gib hook screw will not need to be removed, keeping it safe and unmarred.
- Bobbin Case Base will not need to be removed.
So, be sure to watch the full video tutorial above as Carmon demonstrates how this tool works, paying special attention to the instructions for use. There is a proper way to use it!
How To Use the Thread Jam Tool:
- Remove the needle / throat plate.
- Place a towel between the faceplate and bed extension, and then stand the machine on its handwheel end.
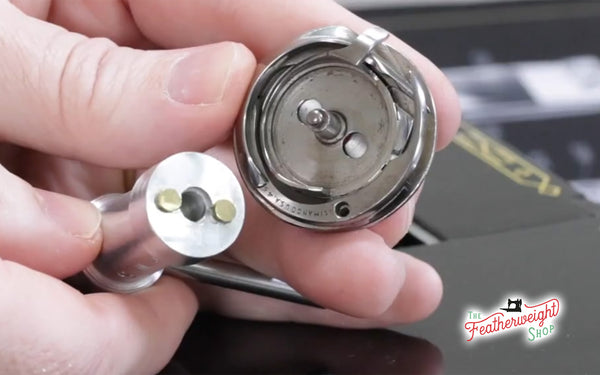
- Insert the Thread Jam Tool over the bobbin case post, aligning the small, round tabs on the tool to the bobbin case base, ensuring that it is flush against the base.
- While holding the handwheel, turn the tool clockwise until there is no resistance.
- Inspect the bobbin case base for any thread that may have been expunged, often times it's a very small piece.
- Reinstall the needle / throat plate, making sure that the positioning finger is in the slot on the underside of the throat plate.

VERY IMPORTANT: Once the thread jam is removed make sure the positioning finger on the bobbin case base (as indicated by the arrow in the photo above) is seated in the slot on the bottom of the throat plate before tightening the two throat plate screws. The machine won’t sew until the finger is in the slot. (Related: Click here for a full-length tutorial on Troubleshooting Stitch Formation.)
This new tool is available now and it works on all Featherweight Hook Assembly styles. To determine which style is needed for the proper hook assembly, look at the little gib screw hole. Is it round (most common)? Or is it oval (very scarce)?

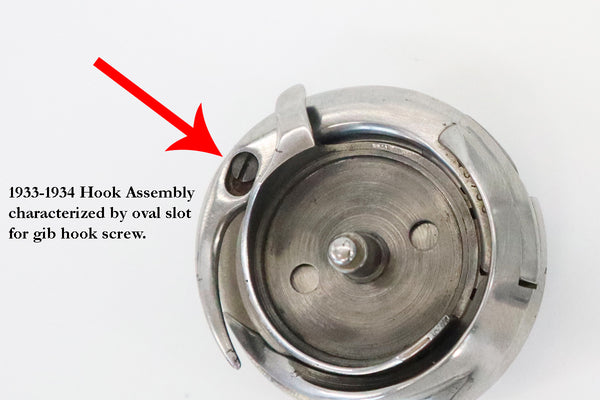
The most common hook assembly (from about 1935 and later) has a tiny round hole for the gib screw. If working with early Featherweights (from 1933 to about 1934), very, very few had an oval gib screw hole. Some were switched or updated over the years, so, be sure to select the style that matches the current hook assembly that is on your machine.
(Related: A Complete Guide to the Variations of Featherweight Hook Assemblies.)