
Love Letter Pillow Cover Sewalong - Part 1

Hello everyone! The Featherweight Shop team has eagerly been awaiting today, when we get to share this lovely Valentine's themed kit - the "Conversation Love Letter Pillow Cover!" We hosted a Featherweight Fellowship and sew along in 2018 and are revisiting that fun tutorial again, week by week leading up to Valentine's Day, but this time offering our own kit with adorable love-themed fabric. We enjoyed our sewing time together and hope you do, too - whether you make another Love Letter Pillow Cover like ours below or are making your own for the very first time!
If you are just now joining us, please review the previous blog post by clicking here for the pattern and a list of supplies needed or purchase the Love Letter Pillow Cover Kit!


SEWALONG SUGGESTED SCHEDULE
Wednesday, January 20th, Part 1
Wednesday, January 27th, Part 2
Wednesday, February 3rd, Part 3
Wednesday, February 10th Part 4
When I first saw the Love Letter Pillow it made me think of the old airmail envelopes my grandma would let me play with when I was a little girl, so I knew I had to make a little pillow for our home that I could bring out for Valentine's display each year. I love old-fashioned mail and I love decorating for this sweet Valentine holiday, therefore the pillow was a must!

This will be a relatively simple Sewalong because the pattern essentially has just one "block", so we will each proceed at our own pace with me highlighting some tips and sewing ideas as I read through the steps along with you. I've taken lots and lots of photographs for how I construct a quilt block and I am so excited to share them with you! You can take what you learn here and implement them with the pattern instructions on the Love Letter Pillow. If you get stuck or have any questions whatsoever, don't hesitate to call or email - I am happy to help or walk you through it.
Oh! I wanted to post a quick reminder... Nadra from ellis & higgs has been so gracious to permit us to offer her digital patterns on our website and we encourage you to share your progress for others to see her lovely designs all sewn. Plus, we all love seeing what you make and it helps others who will participate in the future. Please be mindful, however, to not photograph the pattern or design elements so we can all be on the up-and-up with integrity to support Nadra (and so she can keep designing darling new patterns for us, too!)
So let's begin...preparing!
Before proceeding, it is always wise to read through your entire pattern carefully as you mentally picture the steps and what you'll need to do. Make sure your printer prints the measurements clearly so you don't accidentally mistake a number for another like I did with one cut...
1. FABRIC SELECTION
I have quite a few vintage floral and dainty fabric prints already in my fabric collection. We will have six employees participating, plus Ruthie and me sewing, so I needed to find 8 dark pinks, 8 medium pinks, and 8 light pinks according to the pattern. Below are some examples I chose, so maybe these will help you with your selection and give you some ideas... The darker shade of pink on the bottom, with the medium shade in the middle and lighter shade on the top. I also added a different red for the heart on one of the sets.

Different hues of pinks in different shades, but all follow the color guidelines of Dark, Medium, and Light.
For an interesting article on the technical terms of hue, shade, tint, and tone - click here!
After you select your fabrics, it's time to prepare, press and square them up for cutting.
2. PRESSING, SQUARING & CUTTING
PRESSING
Being that this is a small pattern, and the fabrics we are using are selected from various scraps and fat quarters, here are some pressing tips that I have found invaluable!

First and foremost I have become an avid fan of 100% pure and natural wool in the Quilter's Pressing Fleece. Pressing on wool makes the creases virtually disappear without the need for steam or sprays. BUT, if I do need to use Best Press for some of those stubborn factory folds, my fleece is ideal for that purpose. So, if you haven't converted to pressing on 100% pure & natural wool yet... well, you should - you won't regret it. It's amazing!

SQUARING UP YOUR FABRIC
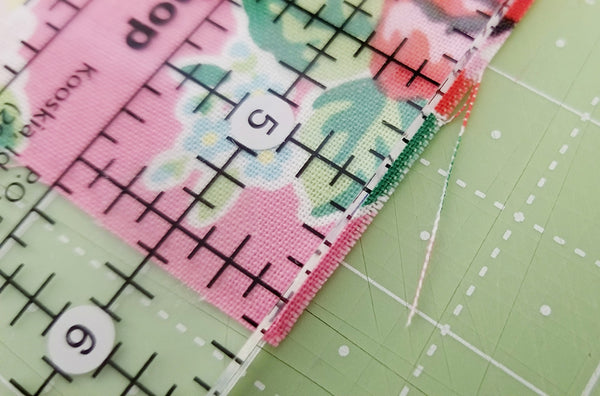
I don't want to skip over this topic because it is so very important. For another recent project, I actually photographed what happened when I got in a hurry and didn't square my fabric properly. This is often called the "dog-leg" effect, especially when cutting strips (but it even happened to me with a wider cut as you'll see below).

As you can see in the photograph above, the top one I cut has a bend at the fold. When this happens, it not only wastes fabric but can greatly affect the accuracy of your blocks. Therefore, square up your fabric!

I have found the video tutorial above to be invaluable for accurate strip cutting from full yardage, but the same technique can be applied to smaller sub cuts and squaring up fat quarters as well. Essentially, it's all about fabric grain lines... both fabric layers need to have grain lines that are parallel and perpendicular to your cutting ruler or the grid lines on your mat (whichever you are using as your guide).


Notice in the photo above how the dashed ruler lines at the top are dissecting the fabric edge (or fold) in these photos? This is part of the alignment process for how I square up my fabric. Anytime I can utilize the dashed lines to see the dissection at the edge of the fabric, I do. Below is another close-up example:

CUTTING
Cutting goes hand-in-hand with squaring up, but when you get down to actually cutting your pieces as the pattern instructs it's like the prelude to a symphony... or the "wind-up" so you can begin to sit down and sew. I like to cut everything I need first and have it all laid out. This way I can keep it nicely organized and contained if I need to stop or set it aside for a little while.

Cutting accurately tends to have many variables, but with this pattern, if you want the shape of the heart and the envelope flaps to align, the more accurate you are with your cutting, the easier construction will be.
Measure twice, and cut accurately once! That little tiny bit extra at the edge...? Yes, it really can make a difference, so trim carefully.

You'll probably see this particular Featherweight Shop Ruler a lot as I construct the Love Letter Pillow. This 2 1/2" by 6" ruler is my favorite size to have right by my machine. I use it to cut off any half-square triangle pieces, the triangles from flying geese and anywhere I need small cuts. It's a Creative Grids ruler, so it has patented "self-gripping" nubbies that grip that fabric, and I find it has far less slipping as I rotary cut to the end of the ruler - I love it!


We love any "airmail" themed fabric for the binding!