Free Shipping on All U.S. Orders!

My Cart

Taxes and discounts calculated in checkout.

This order will earn you 0 POINTS in Sewciety Rewards

Order Subtotal
$ 0.00
Total Savings
$ 0.00
| Posted by Tammy Olson

The Merry Mug Mat Tutorial

Christmas is coming! It will be here sooner than we know! It’s time to begin sewing Merry Mug Mats for when family comes to visit during the holiday season! The children, grandchildren and even aunts and uncles will enjoy having a cup of coffee or hot cocoa and a cookie or two on these cheery mats. They are just big enough to use and keep the mess at a minimum- which gives you more time to sew Christmas presents on your Featherweight!Product list for Merry Mug Mats: Merry Mug Mat Kit Sew Handy Sticker Set by Lori Holt Scissors Sewline...


| Posted by Tammy Olson

Vintage Christmas Hot Pads

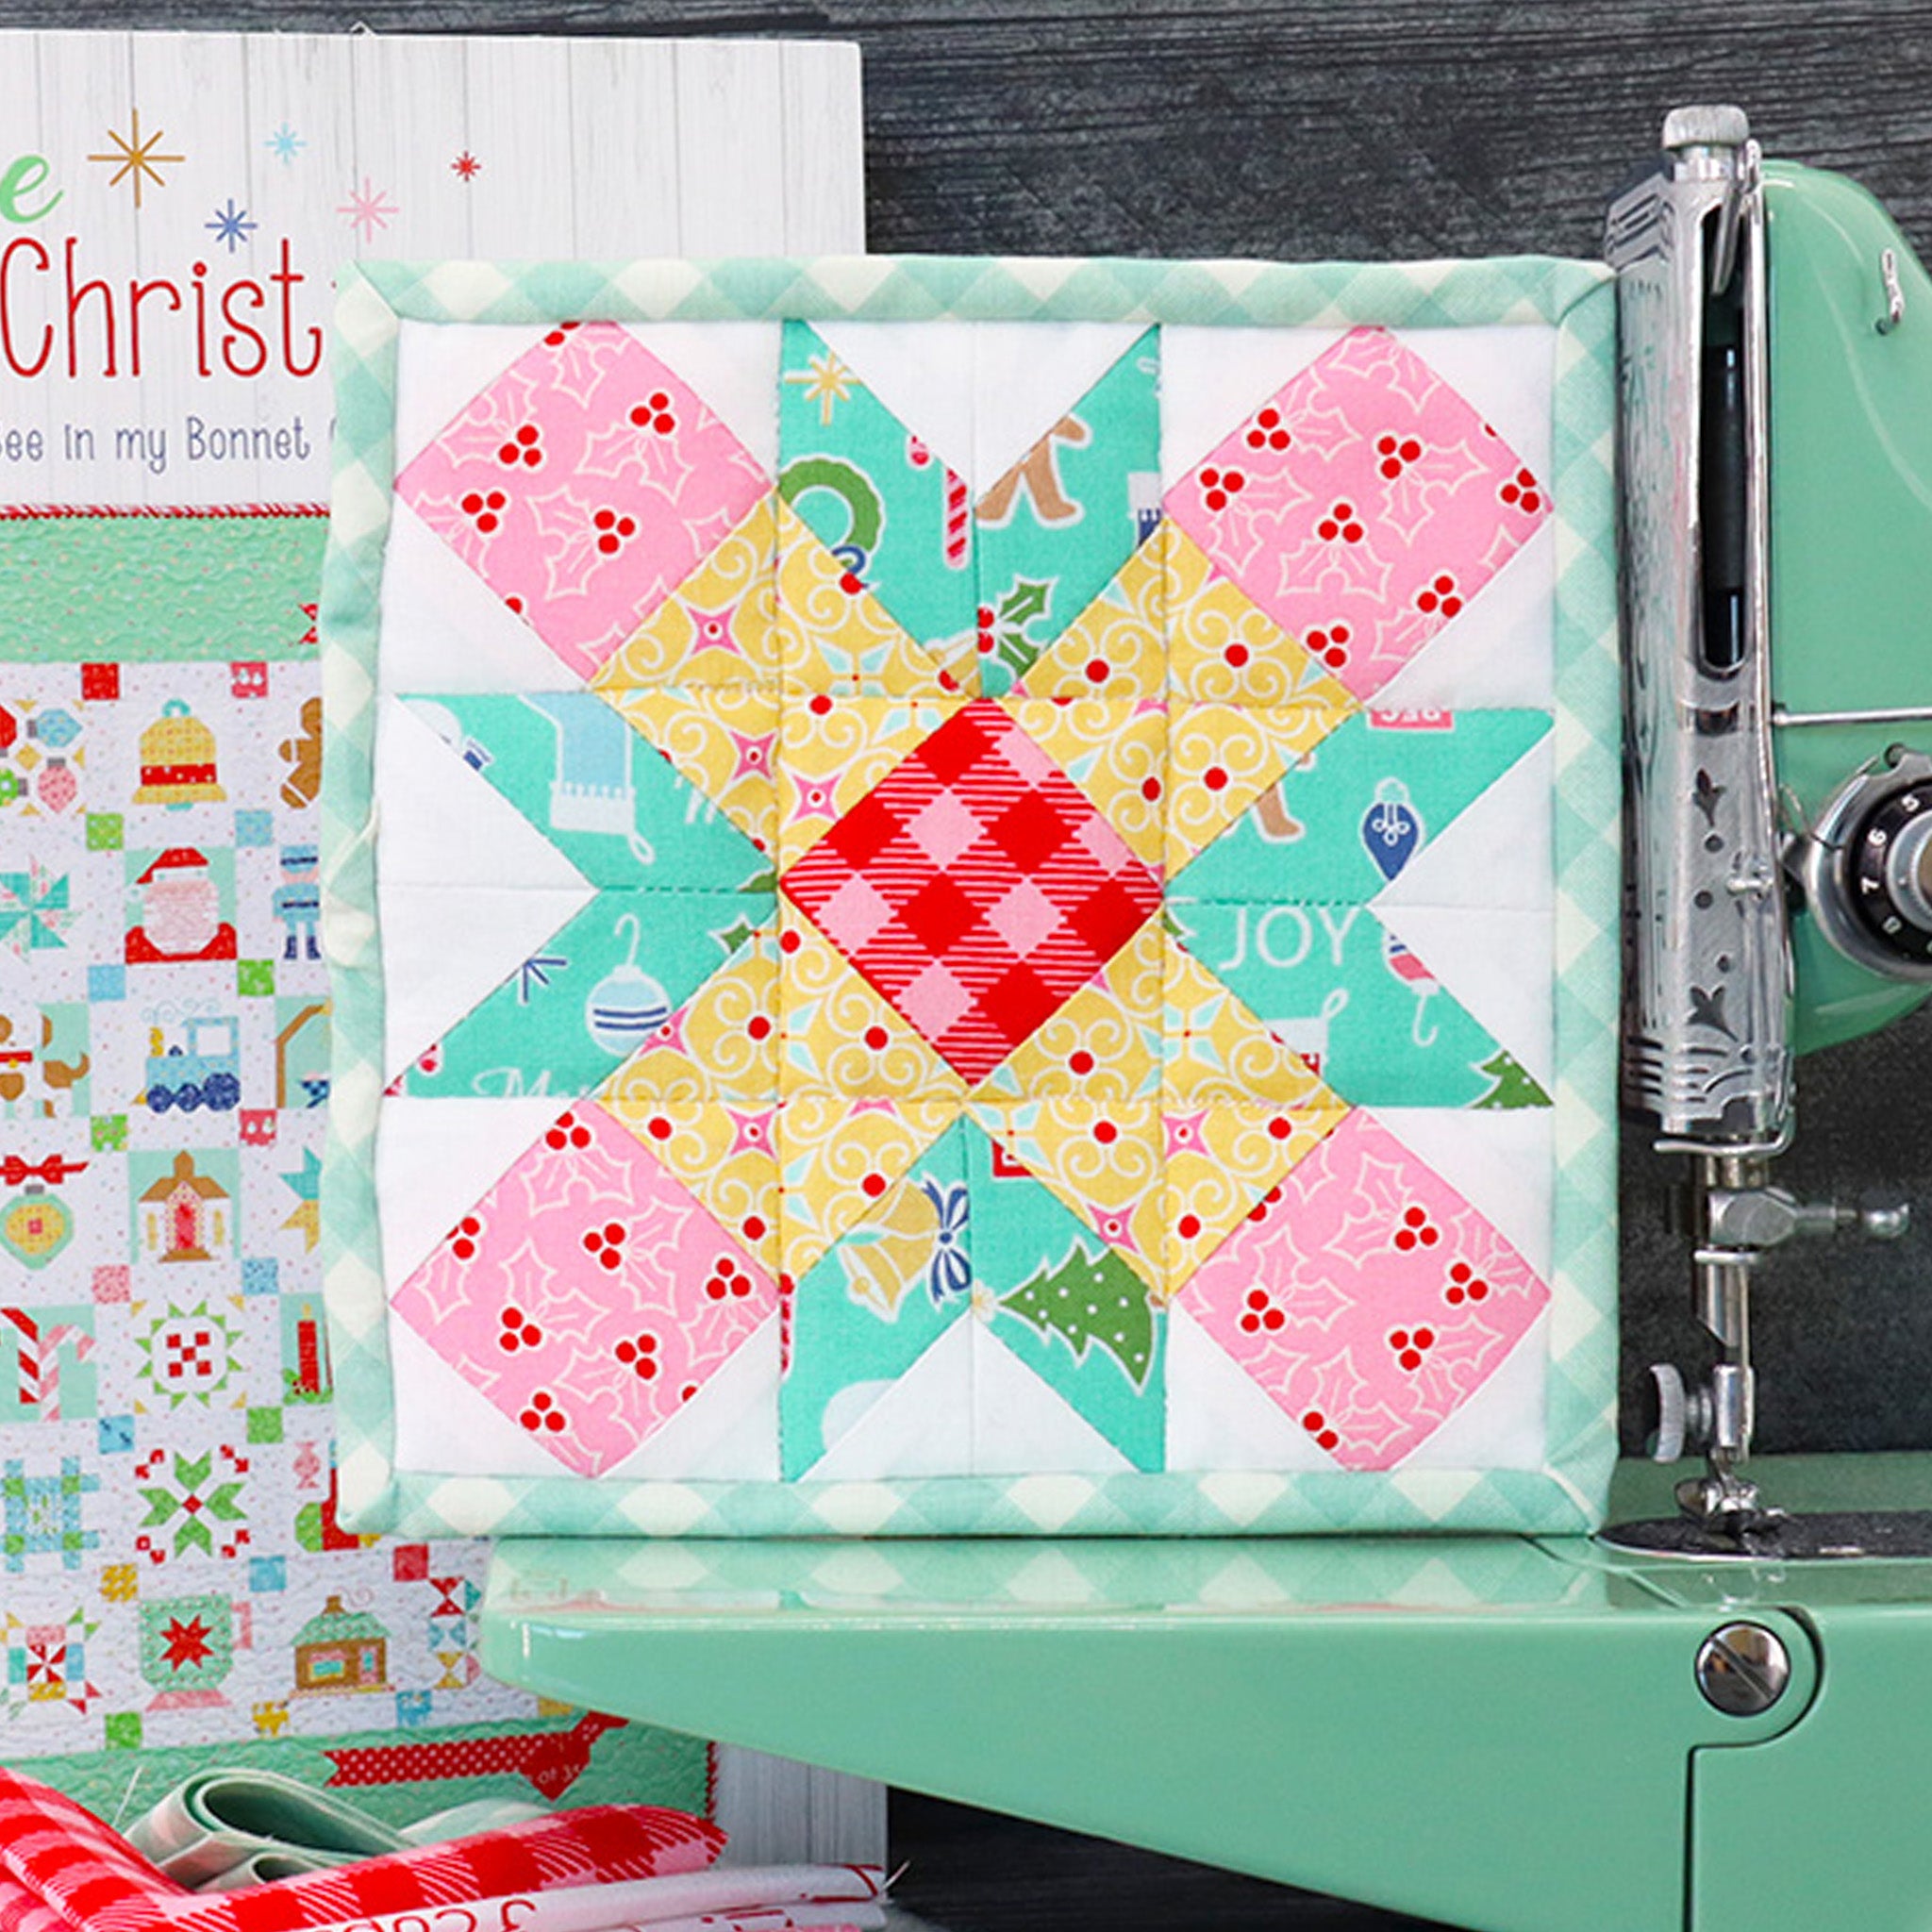
Shop the Vintage Christmas Hotpad Kit HERE Product list: Hot pad kit Aurifil Thread 50wt Cotton - 1300 Meter Spool Walking Foot, Even Feed Insul-bright Glass Head Pins, Blue Super Fine Cutting Ruler, QUILTER'S SELECT 2 1/2" x 12" (Non-Slip Coating) Rotary Cutter, OLFA Deluxe Ergonomic 45 mm - PACIFIC BLUE Cutting Mat, 12" x 18" Lori Holt Cute Cuts Reversible (Green & Blue) Nifty Needles, Color-Coded - By Lori Holt of Bee in My Bonnet MINI Wonder Clips, Bag of 20 ct. Assorted Colors  Directions for how to turn the quilt block into a hot pad: Gather your collection...


| Posted by Tammy Olson

Mini Iron Purse Kit

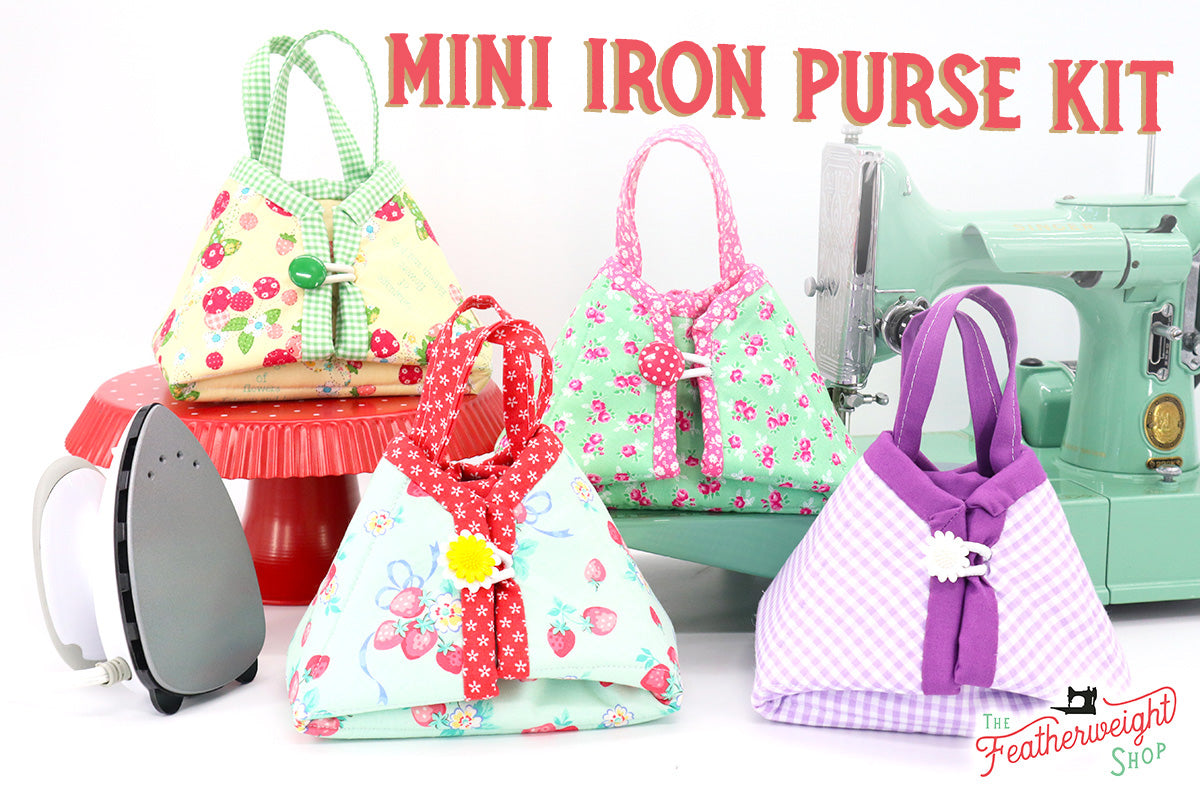
Shop the Mini Iron Purse Kit HERE Products Used:Mini Travel IronFabricFeatherweight Accurate Seam Square & Seam Guide or or 1/4" Foot - Low Shank ScantOlfa Rotary Cutter12" x 18" Lori Holt Reversible Cutting MatSewline Water Erasable Roller Ball PenSuper Fine Glass Head PinsAurifil ThreadCreative Grids Ruler Itty Bitty EightsQuilter's Pressing FleeceWalking Foot, Even FeedThread SnipsTracing WheelI was pretty excited to begin working on the Mini Iron Purse Kit! It looks so much like a sweet little purse! Who would ever know there was a travel iron inside?! Little did I know that I would be practicing a little math from high school with this pattern. The...


| Posted by Carmon Henry

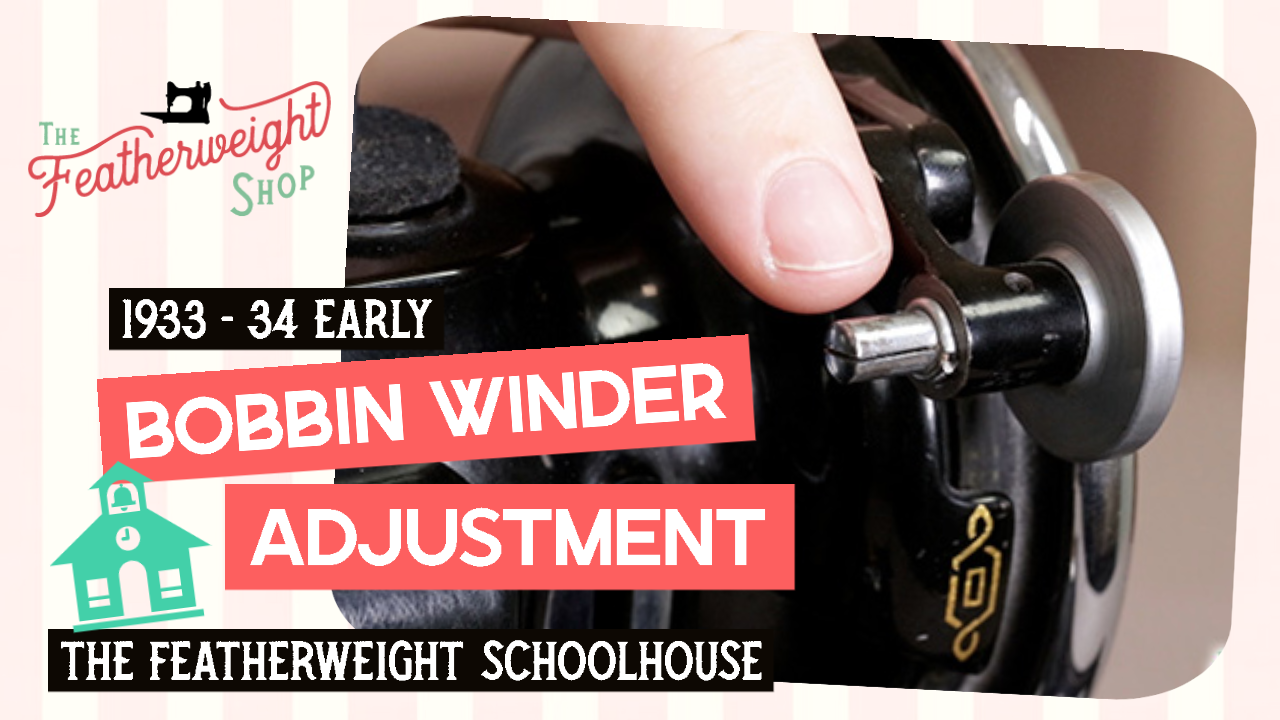
Early Featherweight Bobbin Adjustment

Today, we are going to review the early bobbin winder from the 1933 and 1934 Featherweights, and troubleshoot a loose bobbin seated on the post. Tools Needed or Recommended: Bobbin WinderBobbinsSlim Kitchen Knife (Paring Knife)Other Products Mentioned:Thread As you can see in the picture below, there is a little spring seated inside the post on the bobbin winder. (Bobbin winder was removed from the Featherweight for video tutorial and visual aid.) This spring looks very similar to a small wire. The early bobbin winders on the 1933 and 1934 Featherweights did not have that wire. Instead, there was just a slot. Common Bobbin Winder With...


| Posted by April Henry

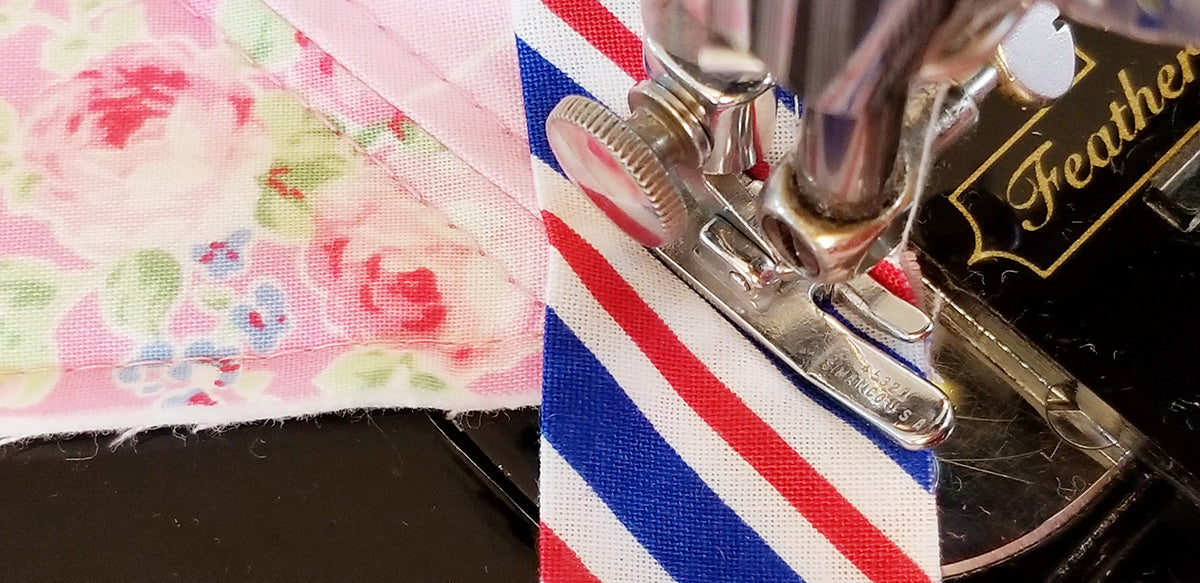
Love Letter Pillow Cover Sewalong - Part 4

Binding a Pillow Cover! ... Or use these tips for your next quilt!  Part 4 is the final installment of our Conversation Love Letter Pillow Sewalong!  We are very excited to finally display our little pillows and just in time for Valentine's Day!  Are you just now joining and feeling late to the party?  No worries at all... be sure to review our supplies list page and Parts 1, 2, and 3 and you can participate at any time!  To continue with the Airmail theme of the Conversation Love Letter Pillow, I was able to find some red, white and...


| Posted by April Henry

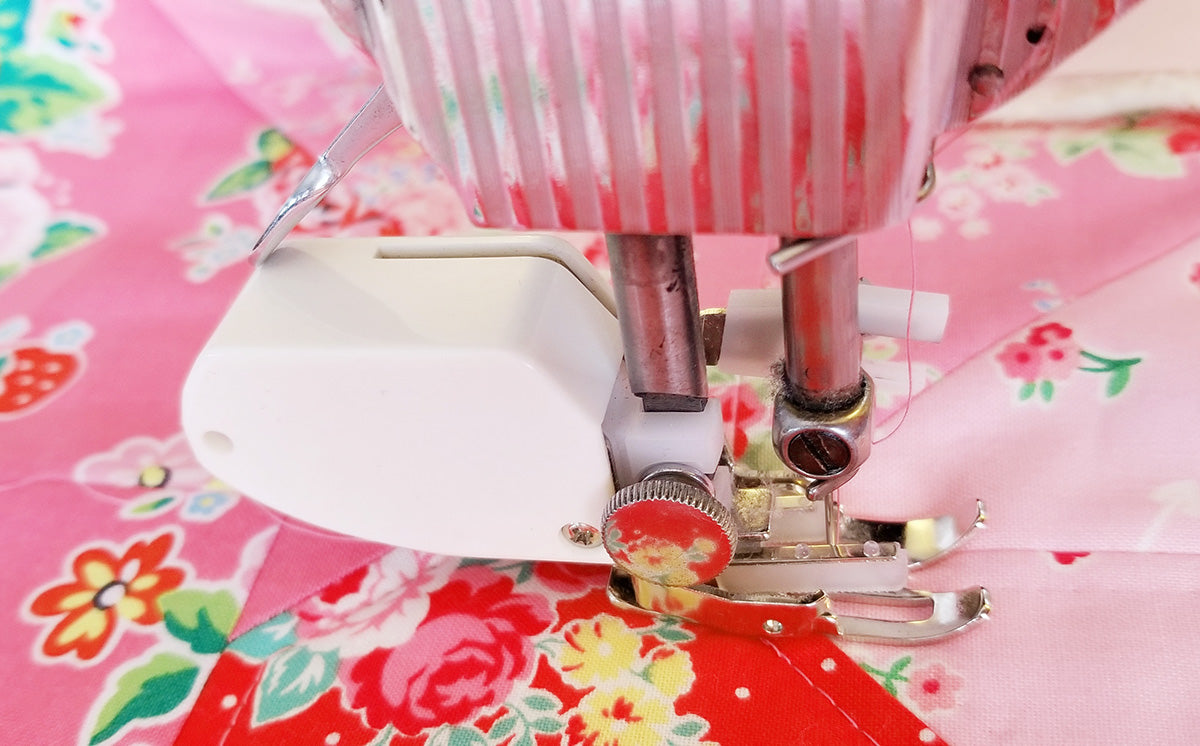
Love Letter Pillow Cover Sewalong - Part 3 (Walking Foot Tutorial, too!)

Let's Quilt on the Featherweight! We are now moving on to the quilting process of the Love Letter Pillow.  If you aren't quite finished with piecing your final block, then refer back to Part 2 of the Sewalong for some piecing tips.  For quilting, we have opted to use the Walking Foot designed for the Singer Featherweight. The teeth on the walking foot align to the teeth on the feed dogs so this will eliminate any unnecessary shifting and allow for more even feeding during the quilting process. To begin quilting (this applies to any quilt) you will want to...


| Posted by April Henry

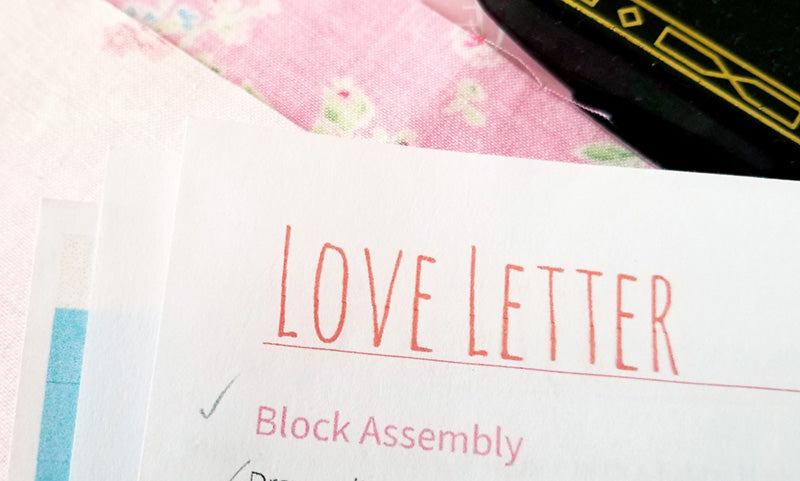
Love Letter Pillow Cover Sewalong - Part 2

Now Let's Sew! If you haven't selected, squared or cut out your fabric yet, then refer back to Part 1 of the Sewalong before proceeding. I like to place a little pencil mark next to each instruction I have completed. Doing so means I will know right where I left off if I have to set my project aside for any reason. Before construction, be sure to label your pieces well as instructed, follow the pattern layout directions and begin sewing your pieces together following each pattern step carefully!  Nadra has some great tutorials on her website, too, including this...


| Posted by April Henry

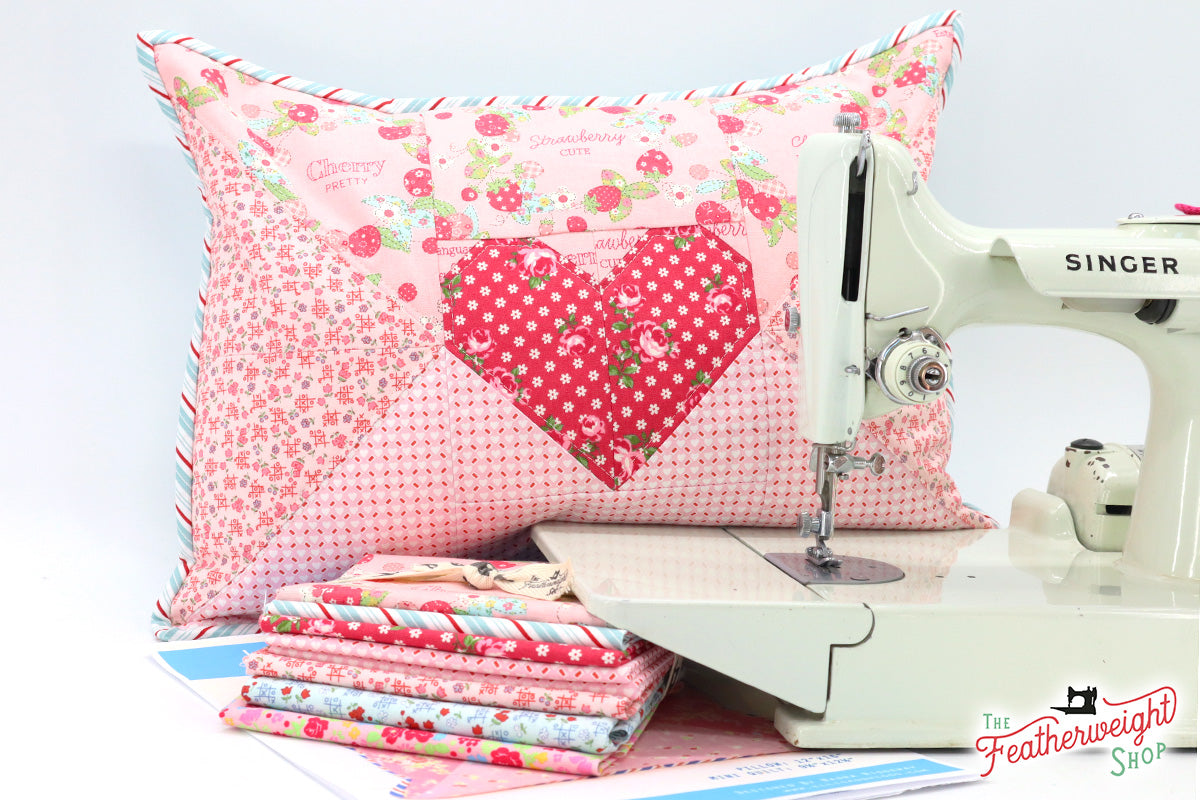
Love Letter Pillow Cover Sewalong - Part 1

Hello everyone! The Featherweight Shop team has eagerly been awaiting today, when we get to share this lovely Valentine's themed kit - the "Conversation Love Letter Pillow Cover!" We hosted a Featherweight Fellowship and sew along in 2018 and are revisiting that fun tutorial again, week by week leading up to Valentine's Day, but this time offering our own kit with  adorable love-themed fabric.  We enjoyed our sewing time together and hope you do, too - whether you make another Love Letter Pillow Cover like ours below or are making your own for the very first time! If you are just...


| Posted by April Henry

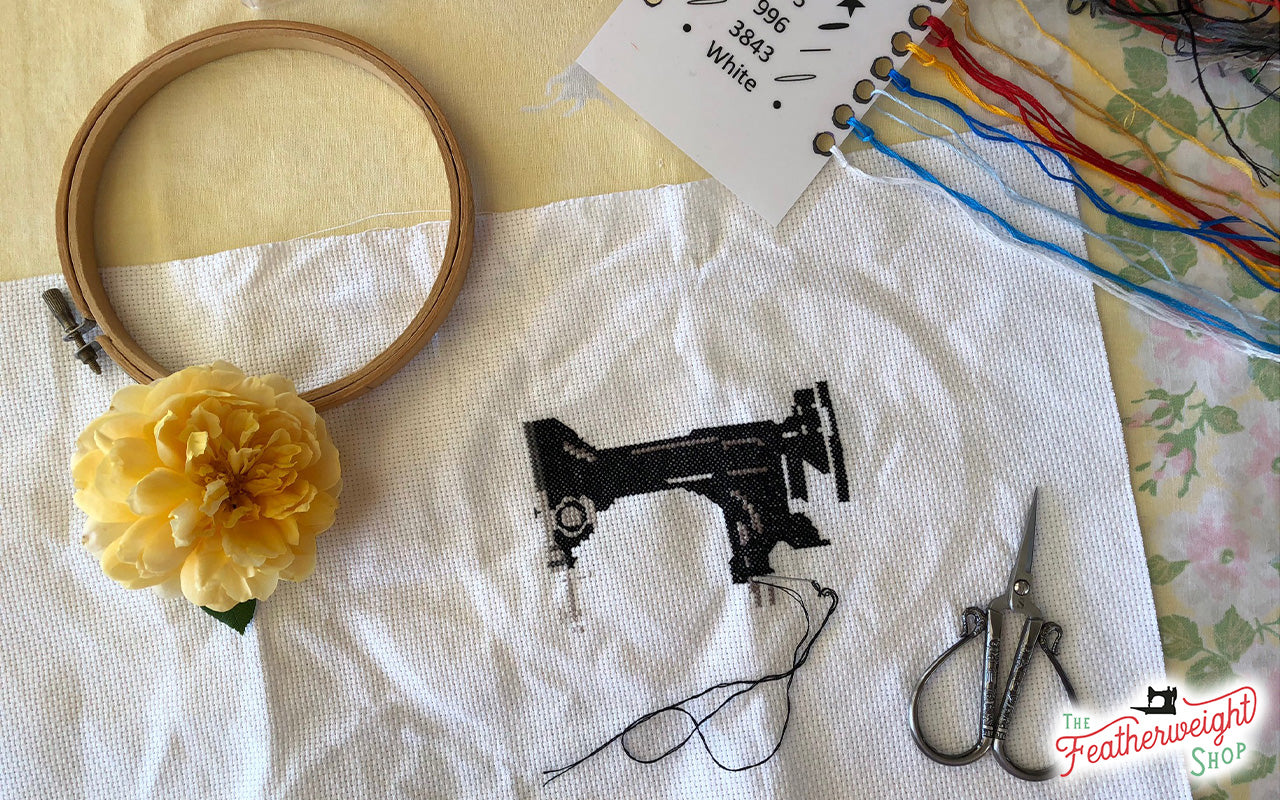
Stitch Along: Singer Featherweight in Cross-Stitch - Part 2

Singer Featherweight in Cross Stitch – Faster Stitching & Fixing Mistakes
by Kristen Clay, guest blogger

Time for a progress update on the lovely Singer Featherweight cross stitch kit! As you can see, it has started to definitely look like a sewing machine...


| Posted by Ashley Fritsche

Restore Along Part 31

Welcome back to the Restore Along with Julia and Tulip. Previously, Julia has applied one full set of practice coats of paint to Jill, the Featherweight donated to her for practice purposes. After assessing the results, she stripped all the paint off Jill and reset for another round. You can catch up on the journey so far here by catching up on last week's installment here: Previous Week Restore Along: Part 30 With the coats of primer applied and dried, the time for applying color is here. One reason Julia is thoroughly practicing her painting skills is the learning curve...


| Posted by April Henry

Stitch Along: Singer Featherweight in Cross Stitch - Part 1

Everyone knows it's fun to sew something quilty with a Singer Featherweight, but it is also enjoyable to use your needle in a different way and stitch a Singer Featherweight itself! I'm Kristen from Verity Vintage Studio, and in the coming weeks I'm excited to walk with you through stitching this lovely cross stitch kit designed by Margaret Lee and available from The Featherweight Shop.  Counted cross stitch can look quite complicated at first glance, but it's actually quite easy and manageable when broken down. Even elaborate designs usually use just little crosses (made of straight stitches) and regular straight...


| Posted by Ashley Fritsche

Restore Along Part 30

Welcome back to the Restore along with Julia and Tulip (and Jill)! Last week, Julia was on round two of her painting practice, giving a fresh coat of primer to Jill. Find out what issues came about in last week’s installment here: Restore Along Part 29 Today’s work begins with a gentle sanding of Jill’s first coat of primer as preparation for a successful, even second coat. Using wet 600 grit sandpaper, Julia folds the sandpaper around a q-tip for a little extra padding and rubs lightly in one direction (not circles).  During this sanding process, Julia develops a creative...


| Posted by Ashley Fritsche

Restore Along Part 29

Welcome back to the Restore Along with Julia! Last week, Julia continued to work on Jill, stripping the first red coat of paint in preparation for another practice run. To catch up on the progress so far, read last week’s installment here: Previous Restore Along: Part 28 Julia starts by inspecting the past day's work with her magnification lens headset. Sure enough, there are still minute specks of paint to remove.  Julia spends the next two hours removing every particle she can find, in addition to applying liquid latex where needed. At last, Julia is ready for her second round...


| Posted by April Henry

Farm Girl Vintage Finished Quilt + BONUS! Scalloped Border Step-by-Step

  Farm Girl Vintage Sew Along - Finished Quilt with Scalloped Border At the end of February, the borders and sashing were pieced, the quilt top was finally assembled and delivered to the local longarm quilter for a small bit of custom quilting.  Two years to the month and here we are... the Farm Girl Vintage Sampler quilt is completely finished!  We started in March, and two years later, it's all sewn, quilted and bound.  Isn't it exciting!?  This quilt is probably the most time-laborious project I've ever sewn, and it's certainly the most tedious with all the sampler block...


| Posted by Ashley Fritsche

Restore Along Part 28

Welcome back to the Restore Along with Julia! of Tulip. Before attempting to repaint Tulip, Julia has been working diligently with Jill, her practice machine, learning how to properly strip, prep, and paint. Last week, Julia completed her first test coat of Soul Red Metallic paint on Jill. It was a learning experience! Previous Post: Restore Along Part 27 Julia intends to get at least one more round of painting practice out of Jill, so she must make sure to get every last bit of red paint off, as well as re-mask the machine where needed. While finishing the paint stripping,...


| Posted by Ashley Fritsche

Restore Along Part 27

Welcome back to the Restore Along with Julia and Tulip. After months of hard work, today is the day Julia will practice applying the layers of Soul Red Metallic paint to Jill, the machine she has been gifted as a way to practice her technique. If you’ve missed any, you can catch up on previous installments below. Previous Post: Restore Along Part 26: Time to Paint! Jill has already been primed, and now Julia dives right in, excited to see the first coat of red on her practice Featherweight.  The first coat goes on fast. A little too fast! Julia's sprayer...


| Posted by April Henry

Final Quilt Top - Finishing the Farm Girl Vintage Sew Along

Farm Girl Vintage Sew Along - Sewing the Top Together Last post we finished up by having all of our sashing and border pieces cut and ready.  How nice it was to have everything prepared, because the quilt top sewed together so much faster than I anticipated.   There are quite a few tips and hints in our final* installment of the Featherweight Shop Farm Girl Vintage Sew Along, so grab a cup of coffee or tea and let's finish this! * I just dropped off the quilt top yesterday to have it quilted, but as soon as I finish the scalloped...


| Posted by Ashley Fritsche

Restore Along Part 26: Time to Paint

Welcome back to the Restore Along of Tulip! Previously, we followed along with Julia as she prepared for the task of painting Tulip by practicing on Jill, a Featherweight donated for this purpose by a member of the Featherweight community! So far, Julia has applied two coats of primer to Jill. If you are joining in, you can catch up on last week here: Previous Post: Restore Along Part 25 Today, Julia starts with some touch-ups to Jill, including a little more paint mask and liquid latex where needed.  Julia also planned to wrap some painter’s tape around the silicone plug...


| Posted by Ashley Fritsche

Restore Along Part 25: Sanding Jill & Cleaning Tulip

Welcome back to the Restore Along of Tulip! If you are joining in, catch up on last week’s installment here: Previous Post: Restore Along Part 24 ~ Tech Support to the Rescue! Jill’s second coat of primer is dry, and Julia gives it a once-over with 1000-grit sandpaper, which she hopes is coarse enough to provide the next layer of paint a good surface to stick to.  Jill is nice and smooth now, and Julia is pleased with the result of her primer painting practice. Julia removes the silicone plugs she used in the process and washes the gray primer off of them...


| Posted by Ashley Fritsche

Restore Along Part 24: Tech Support to the Rescue!

Welcome back to the Restore Along with Julia & Tulip (and now Jill!) Julia painted the second coat of primer on Jill, her practice machine, to get her ready for the colored paint coats! If you are tuning in, you can catch up on last week’s progress here: Previous Post: Restore Along Part 23 Julia’s Featherweights don't have perfect bodies. Jill, like many Featherweights, has casting flaws: sand-type bumpy areas in the motor mount and bobbin areas, a few little pointy bumps on the base around the column area, and a very uneven area around base's edge on the handwheel side....


×

READ MORE
+