Free Shipping on All U.S. Orders!

My Cart

Taxes and discounts calculated in checkout.

This order will earn you 0 POINTS in Sewciety Rewards

Order Subtotal
$ 0.00
Total Savings
$ 0.00

BROWSE SCHOOLHOUSE

SHOP BY CATEGORY

| Posted by Christian Henry

Light Flickering with Foot Controller Depression ~ Electrical Adjustment

  The light should only turn on and off with the flick of the switch, not the foot controller. So, if you press on the Featherweight foot controller and the light flickers off just as the motor runs, then there has been an inadvertent electrical reversal at some point in the machine's wiring history.  Unplug your machine and watch the video tutorial above to learn the steps for proper Featherweight electrical connections.   Just remember, if the machine is plugged in, it is considered on and ready to sew regardless of whether the light is on.  The switch is only for the light,...


| Posted by Christian Henry

Why Is My Singer Featherweight Sewing Slowly?

Vintage Singer Featherweight sewing machines are widely known for their straight stitches, speed, and reliability. But, as you sew, a sluggish or slow sewing machine is a sure sign that something is amiss. Fortunately, simple tools and a little Singer know-how can quickly remedy the most common causes of a slow motor. Today, we'll review these possible issues and how to solve them. Products Recommended:Singer Featherweight Maintenance HandbookThread Jam Removal ToolThread-O-StatSew-Retro Sewing Machine OilSuperbelt You may notice that your machine doesn't sew with as much vigor as it used to, or you may acquire a vintage Featherweight that sews with less gusto...


| Posted by Christian Henry

Singer Featherweight Foot Controller Rewiring

Many Featherweight owners send us their original Foot Controllers for rewiring. We offer this service for those who want to keep their Original Foot Controller and Bakelite plug but want it to be electrically safe. The video above demonstrates the process of rewiring an original Singer foot controller, plus, we now carry a kit including all the rewiring parts so that you can perform this DIY "do-it-yourself" repair at home.   SUPPLIES AND TOOLS: The Featherweight Foot Controller Rewiring Kit  Wera Screwdrivers: Mid-Length & Long Foot Controller Cushions Needle nose pliers Wire strippers Wire cutters Below are a few pictures and instructions from the...


| Posted by The Featherweight Shop

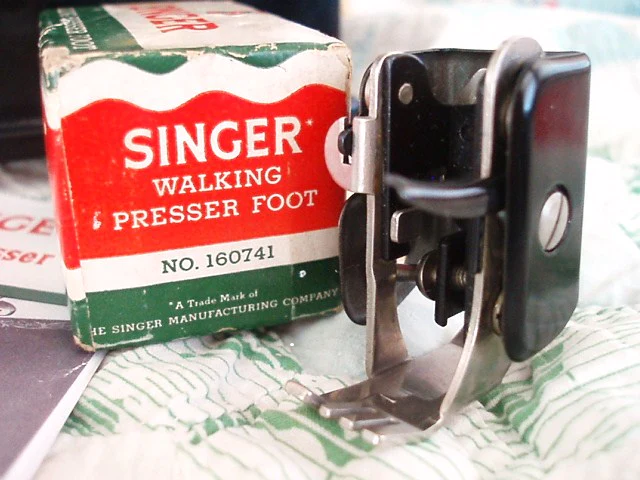
What Is The Correct Way Of Identifying A Singer Walking Presser Foot AKA?

The Singer Walking Presser Foot, also known as "The Penguin" due to its adorable waddle while sewing, is one of the most sought-after Singer accessories. 'Penguin' is not an official Singer name, rather it was a cute descriptor applied by a Featherweight collector in the early 2000s. The all-metal Penguin walking foot was specially designed for fabric layers or hard-to-work-with sheen or textured fabrics like tweed, napped, and pile fabrics - any material where an extra steadying grip would make the job easier!  Learn more about the unique features and charm of the Singer Walking Presser Foot "Penguin" here. Don't overlook...


| Posted by Featherweight Shop Staff

How To Use Sew-Retro Oil Tutorial

Welcome to The Featherweight Shop's Sew-Retro Sewing Machine Oil maintenance tutorial! Today, we will review the proper amount of oil needed to maintain the Singer Featherweight sewing machine. Plus, learn how to properly store Sew-Retro Sewing Machine Oil for short-term or long-term storage.  Suggested Products: Sew-Retro Sewing Machine Oil Singer Featherweight Maintenance Handbook Singer Featherweight Maintenance Log Book Pliers   Oiling a Singer Featherweight     Properly maintaining the Singer Featherweight sewing machine is critical to a smoothly running machine that sews beautiful stitches! Knowing where and how much to oil the Featherweight may seem daunting to any Featherweight owner who is...


| Posted by Carmon Henry

How to Clean & Polish Your Singer Featherweight

Easy to clean and easy to polish!  Have you ever wondered how some Featherweight machines look polished and beautiful while others look dull or oily?  Watch the video tutorial below all the way through and learn how to take your average looking Featherweight and turn it into something beautifully reflective.  Cleaning attachments and the shiny parts of the machine are addressed as well.


| Posted by Carmon Henry

White Singer Featherweight Badge Replacement Tutorial

Learn how to install the new replica badge for the White Singer Featherweight in this step-by-step video tutorial with Carmon from The Featherweight Shop. The original white Featherweight badges were a foil that was glued in place. The new Replica Red S Badge is a strong aluminum with a sticker-like adhesive. Follow the step-by-step tutorial in The Schoolhouse.Products Used in Tutorial:1) Acetone (fingernail polish remover)2) Cotton ball3) Replica White Singer Featherweight Badge (New Red S Aluminum Version or Gold Foil Version Order the New Red S Replica Badge HERE 


| Posted by Carmon Henry

Cleaning & Repair for Secure Thumb Screw Placement

  NOTE:  This tutorial is for the Singer Featherweight 221 model in original black, white or tan.  It will work for the Featherweight 222 as well, but the throat plate on a 222 is made of steel, so this technique will rarely be necessary. Products and Tools Referenced: Thumb Screw (Vintage) Thumb Screw (New) Throat / Needle Plate (Vintage) Throat / Needle Plate (New with Measuring Lines) Amoeba Embroidery & Darning Plate & Screw Buttonholer Feed Cover Plate & Screw Underbraider Featherweight Accurate Seam Guide Kerosene (Empty Oil Bottle works great for this) Drip Pan Tray Felt Drip Pad Presser Bar Presser Foot (Vintage)...


| Posted by Carmon Henry

Part 3 of 3 - Featherweight Light Wiring, Troubleshooting a Flickering Light

Featherweight Light Wiring Tutorial Series - Part 3 of 3   In Part 2 of the Light Wiring Series, we examined the light wires and followed a step-by-step process for repair.  Today, in our final installment of the Light Wiring Series, we will discuss the causes as well as how to fix a faulty or flickering light bulb on a Singer Featherweight. Remember, this series is only for Singer Featherweight 221 machines manufactured in the US from 1933 to 1957 and for 221 Featherweight machines manufactured in the UK from 1947 to about 1951.    Tools Needed or Recommended: Gloves Safety Glasses Wera...


| Posted by Carmon Henry

Part 2 of 3 - Featherweight Light Wiring Troubleshooting & Repair

Featherweight Light Wiring Tutorial Series - Part 2 In Part 1 of the Light Wiring Series, we did a basic cleaning of the light wiring lead sheath underneath the machine, which helps to remove some of the exposed oxidation residue that can build up over a long period of time.  Remember, this series is only for Singer Featherweight 221 machines manufactured in the US from 1933 to 1957 and for 221 Featherweight machines manufactured in the UK from 1947 to about 1951 . On the topic of oxidation, sometimes that residue, or corrosion, is not just on the area seen underneath...


| Posted by Carmon Henry

Part 1 of 3 - Featherweight 221 Light Wiring Series

Part 1: A Tutorial on Cleaning the Lead Sheath on a Singer Featherweight 221. Products & Tools Referenced: Light Socket with Sheath Wera Safety Screwdriver (also available in the Set of 4) Gear Cleaning Brush Low Odor Kerosene and Long-Spouted Bottle Sew Retro Grease Small Terry-Cloth Towel (for scrubbing) Felt Drip Pan Large Towel or Shop Rag (for collecting kerosene  drips and old grease) Gloves Mask Eye-Protection The lead sheath on Singer Featherweight 221 models (1933-1957 for US-made Featherweights and 1947-1951 for UK-made Featherweights) covers the light wires and often requires careful cleaning and maintenance if there is any white oxidation present. In...


| Posted by April Henry

Backstitching & Reverse (Getting To Know Your Featherweight, Part 7)

If your Singer Featherweight is missing its instruction manual, we have replicas available for both the Singer 221 and Singer 222.  You can then read along as you follow Ruthie in the Getting To Know Your Featherweight Series.   Related Products and Helpful Tutorials: Presser Foot Stitch Length Lever Stitch Length Indicator Plate (styles vary by year) Stitch Length Plate Screws (only) Presser Bar Tension Screw Thread Post How to Adjust the Stitch Length Lever - Maintenance Tutorial How to Adjust Presser Foot Pressure:  Part 1 and Part 2   REVERSE and BACKSTITCHING: The Featherweight has a simple forward and reverse straight...


| Posted by April Henry

Turning a Corner (Getting To Know Your Featherweight, Part 6)

Let's continue working through the instruction booklet that comes with the Singer Featherweight 221 or 222, learning how to Prepare For Sewing in Part 6 of our Getting To Know Your Featherweight Series. Follow along with the video tutorial above, or scroll down and read through the text and images below.Suggested Products:1) Singer Featherweight Instruction Booklet2) Crosswound Spool of thread: Aurifil or Presencia3) Thread Cutterz or Thread Snips4) Presser Foot or Quarter Inch Foot5) Thread Stand or Thread Post6) Fabric7) Singer Featherweight Instruction Manual 221 or 222 ********************************* Last session, in Part 5, Ruthie instructed on how to prepare for sewing with the Singer Featherweight.  In this segment, she continues her instruction with how to precisely turn a corner. TURNING A CORNER: Using practice fabric...


| Posted by Carmon Henry

Bobbin Winder Servicing

Do you have to hold the bobbin winder down in order to get it to wind?  If so, then the washers around the bobbin winder screw either need replaced or turned around.  Follow the video tutorial or step-by-step photo tutorial below to learn a few simple tips for servicing your Singer Featherweight Bobbin Winder. Relevant Parts and Products: Bobbin Winder Bobbin Winder Washer Bobbin Winder Screw Singer Featherweight Belt Bobbin Bobbin Tension Meter Bobbin Winder Tension Bracket Sewing Machine Oil Empty Oil Bottle (for easy use with kerosene) The cupped washer keeps consistent pressure on the bobbin winder arm, resulting in pressure...


| Posted by Carmon Henry

Tension Unit Proper Threading

Learning to identify the thread path following a routine servicing and maintenance will help diagnose initial stitch tension inconsistencies and give confidence about learning to service a Singer Featherweight further. Parts Mentioned or Used: Tension Unit Tension Disks Upper Tension Take-Up Spring Upper Thread Guide Presser Foot Thread Post Here is a featherweight properly threaded: Comparatively, this threaded machine will have stitch troubles: At first glance, it may appear that they are threaded the same. But, as you can see when comparing the photos, the thread has missed the retaining fork in the threading process.  Making a quick adjustment when threading the machine...


| Posted by Carmon Henry

Presser Foot Height Adjustment and Alignment

Is the presser foot misaligned?  Is the fabric swimming or wandering under the presser foot?  Are their skipped stitches when sewing over thick seams?  Then this tutorial will help with troubleshooting these common problems.  In a previous tutorial we showed how to properly adjust the actual pressure on the presser foot.  Today we will discuss the proper height and position of the presser foot and how to set it accurately.   Parts Discussed: Presser Foot Faceplate Screw Faceplate Presser Bar Presser Bar Clamp & Screw Pressure Knob Singer 221 Feed Dogs Throat Plate Presser Foot Gauge The pressure on the presser...


| Posted by Carmon Henry

Presser Foot Pressure Adjustment

Today we are going to be addressing the presser foot pressure, or downward force on the presser foot. Parts Discussed: Presser Foot Presser Bar Presser Bar Spring Presser Bar & Spring (for white Featherweights only) Pressure Knob Singer 221 Feed Dogs Throat Plate Hook Assembly Featherweight Schematic Servicing Mat First, let’s talk about why the downward force on presser foot matters.  When the presser foot is lowered and compressing the fabric, it needs a certain amount of pressure on it to both feed the fabric and assure that the thickness of the fabric is not stopping a stitch from forming. The...


| Posted by April Henry

Prepare For Sewing (Getting To Know Your Featherweight, Part 5)

As we continue working through the instruction booklet that comes with the Singer Featherweight 221 or 222, we will now learn how to Prepare For Sewing in Part 5 of our Getting To Know Your Featherweight Series. Let's Prepare for Sewing!  Follow along with the video tutorial above, or scroll down and read through the text and images below.Suggested Products:1) Singer Featherweight Instruction Booklet2) Thread Stand or Thread Post3) Thread Cutterz or Thread Snips4) Crosswound Spool of thread: Aurifil or Presencia5) Large Cone Thread, Mugs & Thread Stand6) Super Easy Machine Needle Threader7) Presser Foot or Quarter Inch Foot8) Singer Featherweight Instruction Manual 221 or 222 ********************************* Part 4 explained How To Properly Thread the Singer Featherweight. Since then, we...


| Posted by Carmon Henry

How To Replace the Bobbin Case Latch

Follow along with the tutorial below to learn how to replace the Bobbin Case Latch on a Singer Featherweight 221 or 222.  When does the Bobbin Case Latch need replaced or serviced? Replace the latch when it is actually broken.  Service the latch when it will not spring back to its original position.   To replace or service a Bobbin Case Latch, the latch will need removed.  In order to remove it, access the latch screw on the inside of the bobbin case.  The small Wera screwdriver works best for this, because the bobbin case latch screw is very tiny.  Keep a magnetic...


| Posted by Carmon Henry

Stuck Stop Motion Knob & Handwheel

Today we are addressing a Stop Motion Knob that will not turn on your Singer Featherweight 221 or 222.  Loosening the Stop Motion Knob is necessary to wind a bobbin, but being able to tighten it so that regular sewing can resume is just as important. There are two causes that prevent the Stop Motion Knob from functioning properly.    Handwheel washer is positioned incorrectly. Stop-Motion Knob has been overtightened. Follow along with the video tutorial below as Carmon explains how the stop-motion knob works as well as troubleshooting these two common issues. Tools and Parts Related to Video: Wera Long Maintenance Screwdriver Stop-Motion Set...


×

READ MORE
+